Tuesday, January 29, 2013

How to reduce the startup delay for desktop apps in Windows 8

In case you aren’t aware of this, Windows 8 delays the startup for all desktop apps. Shortcuts located in your Start Menu’s Startup folder as well as the items which run from various Registry locations will be launched after a delay of few seconds. This behavior was implemented by Microsoft probably because Windows 8 is a tablet-oriented OS (another example of how the Desktop takes a backseat in Windows 8). However, you can reduce this startup delay for desktop apps by editing the Registry. Read this post to learn how.

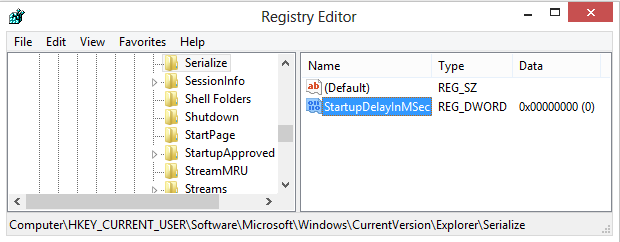
  1. Open Registry editor (regedit.exe) and navigate to the following key:HKEY_CURRENT_USER\Software\Microsoft\Windows\CurrentVersion\Explorer\Serialize If the “Serialize” key does not exist, then you should create it.
  2. Create a new DWORD parameter StartupDelayInMSec and set it to zero, as the screenshot indicates:
    registry editor
    registry editor
That’s all you need to do. Try putting something into your startup folder, e.g. File Explorer shortcut and reboot Windows 8 to see the change.
Bonus tip: Press Win+R on your keyboard, type shell:Startup and press Enter – the Startup folder will be opened.
Although it is not possible to completely eliminate the startup delay, with the help of this tweak you will get noticeably faster startup.

Sunday, January 20, 2013

Make your Computer Welcome You

Do you watch movies? Have you always loved the way how Computers in movies welcome their users by calling out their names? I bet that you too would want to know how you can achieve similar results on your PC and have a computer said welcome. 

Then you are at the right place, this article describes exactly how you can make your computer welcome you like this.

With this trick, you can make your Computer welcome you in its computerized voice. You can make your Windows based computer say "Welcome to your PC, Username."

Make Windows Greet you with a Custom Voice Message at Startup

To use this trick, follow the instructions given below:-

  1. Click on Start. Navigate to All Programs, Accessories and Notepad.
  2. Copy and paste the exact code given below.
Dim speaks, speech
speaks="Welcome to your PC, Username"
Set speech=CreateObject("sapi.spvoice")
speech.Speak speaks
     3.  Replace Username with your own name
     4.  Click on File Menu, Save As, select All Types in Save as Type option, and save the file as Welcome.vbs or "*.vbs".
     5.  Copy the saved file. 
     6.  Navigate to C:\Documents and Settings\All Users\Start Menu\Programs\Startup (in Windows XP) and to C:\Users\ {User-Name}\AppData\Roaming\Microsoft\Windows\Start Menu\Programs\Startup (in Windows 8, Windows 7 and Windows Vista) if C: is your System drive. AppData is a hidden folder. So, you will need to select showing hidden folders in Folder options to locate it.
     7.  Paste the file.
Now when the next time you start your computer, Windows will welcome you in its own computerized voice. 

Note: For best results, it is recommended to change sound scheme to No Sounds.
You can change the sound scheme to No Sounds by following the steps given below:-
  1. Go to Control Panel.
  2. Then click on Switch to Classic View.
  3. Then Click on Sounds and Audio Devices.
  4. Then Click on the Sounds Tab.
  5. Select No Sounds from the Sound Scheme option.
  6. If you wish to save your Previous Sound Scheme, you can save it by clicking Yes in the popup menu.
  7. Click on OK.
Try it yourself to see how it works. In my personal opinion, this is an excellent trick. Whenever I start my PC in front of anybody and the PC welcomes me, the fellow is left wondering how brilliant a computer do I have.

Thursday, December 20, 2012

Create a picture password

Using a picture password is a fun way keep your device secure while not having to remember a complex password. To enable it, press the Windows key + I to get to the settings charm. Click "Change PC settings" at the bottom right, and go to the Users tab. Under "Sign-in options" will be the "Create a picture password" button. This will give you the option to choose any picture, and then define three gestures anywhere on the image. Your gestures can be circles, swipes and clicks. Just try by yourself or follow the instructions. 


This picture shows "Create a picture password" button on right side of your windows, Just click on it.


Second windows, From that you have to choose any image that you want to set as  password by simply pressing "choose image" button .


After choosing the image you have to conform your image by clicking "Use this image".


Finally  u have to make three gestures in your images.


After choosing three gesture, u have to reconfirm your gesture. Finally u got a picture password on your lock screen and also on log-in screen..

Note: I'm just a beginner. if u find any mistake in English, i'm  sorry for that..


Wednesday, December 19, 2012

Find your computer Uptime


A trick for all geeks who would like to know how long since they haven‟t shut down their computer.  

1. Go to Task Manager (Ctrl+Shift+Esc brings without UAC popup) 

2. Go to performance tab.

3. In the system Information you can check out the uptime in the format Day : Hour : Minute : Second


Windows 8


Windows 7


Tuesday, December 18, 2012

To create a bootable USB storage device


Windows Vista and Windows 7/windows 8 can be installed via a bootable USB drive as well. And the installation would be much easier and faster than installation via DVD. Initially Windows Vista/7/8DVD or installation source (setup backup files stored on local hard disk) & a 4GB USB 2.0 Storage device would be required. You can follow the steps to install Windows Vista/7 from USB Drive. 

1. Plug your USB storage device and run CMD and execute the following commands one after another. 


  • Diskpart  Run Disk partition utility 
  • List disk  To get disk index that is used to perform disk partitioning.  
  • Select disk 1  Selects disk to perform disk partitioning.  
  • Clean  Flush your existing all USB drive’s partitions.  
  • Create partition primary  Creates a partition as primary partition.  
  • Format recommended  Format your USB drive with recommended parameters. (No need to worry about file system format)  
  • Active  Set the partition as active to hold bootmgr.  
  • Exit  To quit Diskpart utility  

2. After executing the above commands simply copy all Windows Vista/7 files from DVD/Backup storage to USB storage device.  

3. Change boot settings from BIOS and set it to boot with your USB drive, you can install Windows Vista/7 via bootable USB storage device. That is it. 

Note: For boot problems try Fixing your USB Storage drive with the command  I:\Boot\Bootsect.exe /NT60 I: where I: is the drive letter of USB storage device 

Replace Librarie Icons

Everyone bored with old  library icon. U can change library icon using this software

Download File
( ZIP download, 277 KB)

This is now my libraries looks like pretty good after changing the icons.


  1. Download the file.
  2. extract the files using winrar or winzip
  3. Run LibraryIconChanger.exe
  4. In libraries column choose the library, which u want to change.
  5. U can use exiting icon in DLL.icon column or click the Select new icon from file button and choose the icon..
  6. Then simply close the windows and restart u r system..


Finally u with experience the changes..

for any queries comment..

Sunday, December 16, 2012

Find out How Healthy Your Battery is on Your Laptop


Windows 7 has a feature through which we can find out exactly how much battery you are actually getting from your Laptop battery, i.e. its efficiency, maximum charge potential.  

It‟s a well-known fact that as the age of lithium battery increases its charging capacity decreases and it won‟t charge to its full potential as when it‟s new. We can find out exactly how much the battery of laptop is giving now. We can use the powercfg -energy to find out how health your battery is.  


  1.  Open elevated command prompt by typing "cmd" in your start menu & opening it with administrator privileges.  
  2.  Type “powercfg –energy” into the command prompt & press Enter. 
  3.  The command enables tracing for 60 seconds & would collect all the data after observing the system behavior. 
  4.  After analysis it would generate a report.    
  5.  The energy report is generated in HTML format in the directory shown in the command prompt. 
  6. Cmd Prompt Address\energy-report.html by default. 
  7.  In the HTML file, scroll to the end till you get information like this:   
  8. This shows the battery ID, Manufacturer name, Chemistry, Design capacity and most importantly the last full charge.